The decisions that most intimately shape your property’s value and functionality aren’t made by city planners or HOAs—they’re made where your driveway meets the road. Gravel driveway systems determine whether your property drains properly, supports vehicle weight, and maintains curb appeal through freeze-thaw cycles. Yet research from the National Association of Home Builders shows that fewer than 12% of homeowners understand proper driveway base construction, leading to premature failures that cost billions annually in premature repaving and foundation repairs .
This knowledge gap creates a brutal paradox: the infrastructure decision with the most direct impact on your daily access and property drainage receives the least thoughtful design. While we obsess over kitchen remodels and landscaping, the driveway quietly determines whether your home is accessible year-round or becomes a mud pit every spring. Understanding how gravel systems actually work—and learning to install them correctly—transforms you from a passive property owner into a strategic infrastructure manager.
The Invisible Architecture: How Base Layers Control Everything
Every aspect of your driveway’s performance rests on a foundation of layering decisions. The depth of your excavation, the type of your geotextile fabric, the size of your crushed stone—these aren’t random specifications but deliberate engineering choices that determine whether your driveway lasts 3 years or 30.
Consider something as mundane as gravel depth. A 2-inch layer of crushed stone directly on topsoil will rut within six months under tire pressure. A 6-inch installation with a 4-inch crusher run base and 2-inch surface layer can support heavy trucks indefinitely. The difference? Understanding that the base layer’s compaction—not the surface stone’s hardness—provides load-bearing capacity . This single specification determines whether you spend $400 annually on replenishment or $40.
The cumulative effect of these micro-decisions creates macro-outcomes. Driveways with proper base construction and edging can last 30-50 years with minimal maintenance, while improperly installed ones require complete reconstruction every 3-5 years. The difference isn’t luck—it’s the presence or absence of systems thinking about load distribution, drainage, and material migration.
The Material Decision Tree: Choosing Your Infrastructure
Crusher Run (Base): Mix of 1-2″ stone, sand, and fines. Compacts to concrete-like density. $25-$50/ton. Non-negotiable for base layer.
Crushed Stone (Surface): Angular #57 stone (1-1.5″) locks together. $30-$60/ton. Provides stability and drainage.
**Pea Gravel (Avoid for Driveways):** Smooth, round stones roll and migrate. $50-$100/ton. OK for walkways, disaster for vehicle traffic .
Geotextile Fabric: Permeable fabric prevents subsoil contamination. $0.50-$1.50/sq ft. Critical for longevity, often skipped by DIYers.
Edging: Timber ($5-$15/linear ft), steel ($10-$20/ft), or stone ($15-$30/ft). Prevents spreading and reduces replenishment by 70% .
Delivery: $50-$150 per load. Order 10-15% extra for compaction settling.
The Psychology of Asphalt Bias: Why We Resist the Smarter Choice
If gravel driveways are so cost-effective and durable, why do homeowners consistently choose more expensive options? The answer lies in a combination of status signaling, maintenance phobia, and an education gap that trains us to associate “paved” with “professional.”
The Status Quo Bias: Paved = Professional
Human brains are trained to see asphalt and concrete as “finished” and gravel as “temporary.” This bias bypasses rational cost analysis—even when presented with data that a properly installed gravel driveway costs 60% less over 30 years than asphalt, many homeowners still choose pavement for perceived curb appeal . The reality? A well-edged, properly maintained gravel driveway with contrasting stone colors can outshine a cracked asphalt drive in both appearance and functionality.
The Maintenance Phobia: “I’ll Have to Add Gravel Every Year”
Homeowners assume gravel requires constant replenishment, while asphalt is “set it and forget it.” The data reveals the opposite: asphalt requires sealing every 3-5 years ($300-$500), crack repair ($200-$800), and complete replacement every 15-20 years ($5,000-$8,000) . A properly installed gravel driveway with edging requires only $100-$200 in top-dressing every 3-5 years and lasts indefinitely. The “maintenance” is a simple rake and occasional rake-and-roll, not a yearly truckload .
The Upfront Cost Delusion: Cheap Now, Expensive Forever
A DIY gravel driveway costs $1-$3 per square foot. Professional installation costs $4-$10 per square foot . Asphalt runs $7-$13 per square foot . The immediate $3,000 savings feels significant, but homeowners rarely calculate the 30-year lifecycle. That “cheap” gravel driveway, if installed correctly, costs $0.10 per square foot annually. Asphalt costs $0.35 per square foot annually when factoring in sealing, repairs, and replacement. Over 30 years, the “expensive” gravel saves you $7,500 on a standard two-car driveway .
Pre-Installation Intelligence: The Site Assessment That Saves $5,000
Before you order a single ton of gravel, conduct a three-part site assessment that takes less than an hour but prevents catastrophic failure.
1. Soil and Drainage Reality Check
Dig a test hole 12 inches deep in your proposed driveway area. Is the soil clay (sticky when wet), silt (smooth, flour-like), or sand (gritty)? Clay requires 2-3 inches more base material for stability. Does water pool after rain? You’ll need French drains or crown grading (1 inch of height per 4 feet of width) to prevent puddles . A simple perk test (fill hole with water, time drainage) reveals whether you need enhanced drainage systems costing $500-$2,000 .
2. Load Requirement Calculation
Be honest about vehicle weight:
- Cars only: 6-inch total depth (4″ base + 2″ surface)
- Trucks/SUVs: 8-inch depth (6″ base + 2″ surface)
- RVs/Heavy equipment: 12-inch depth (10″ base + 2″ surface)
Undersizing for heavy loads creates ruts that require complete reconstruction within 2 years.
3. Legal and Utility Mapping
Call 811 for utility locates before you dig. Many driveways cross water lines, septic fields, or underground electric. In rural areas, check property line setbacks—some counties require driveways to be 10 feet from side lines. For driveways connecting to public roads, you may need a permit ($50-$200) and curb cut approval .
The Site Assessment Checklist (Do This First)
Soil Type: Dig test hole, identify clay/silt/sand, conduct perk test
Load Calculation: List all vehicles, determine required depth (6-12 inches)
Drainage Plan: Observe water flow during rain, plan crown grading or French drains
Utility Clearance: Call 811, mark all underground lines, find septic fields
Permit Check: Verify curb cut, setback, and drainage permits with county
The Installation Execution: DIY Steps That Match Professional Quality
A properly installed gravel driveway requires precision, not brute force. Follow these steps for a 20-year installation.
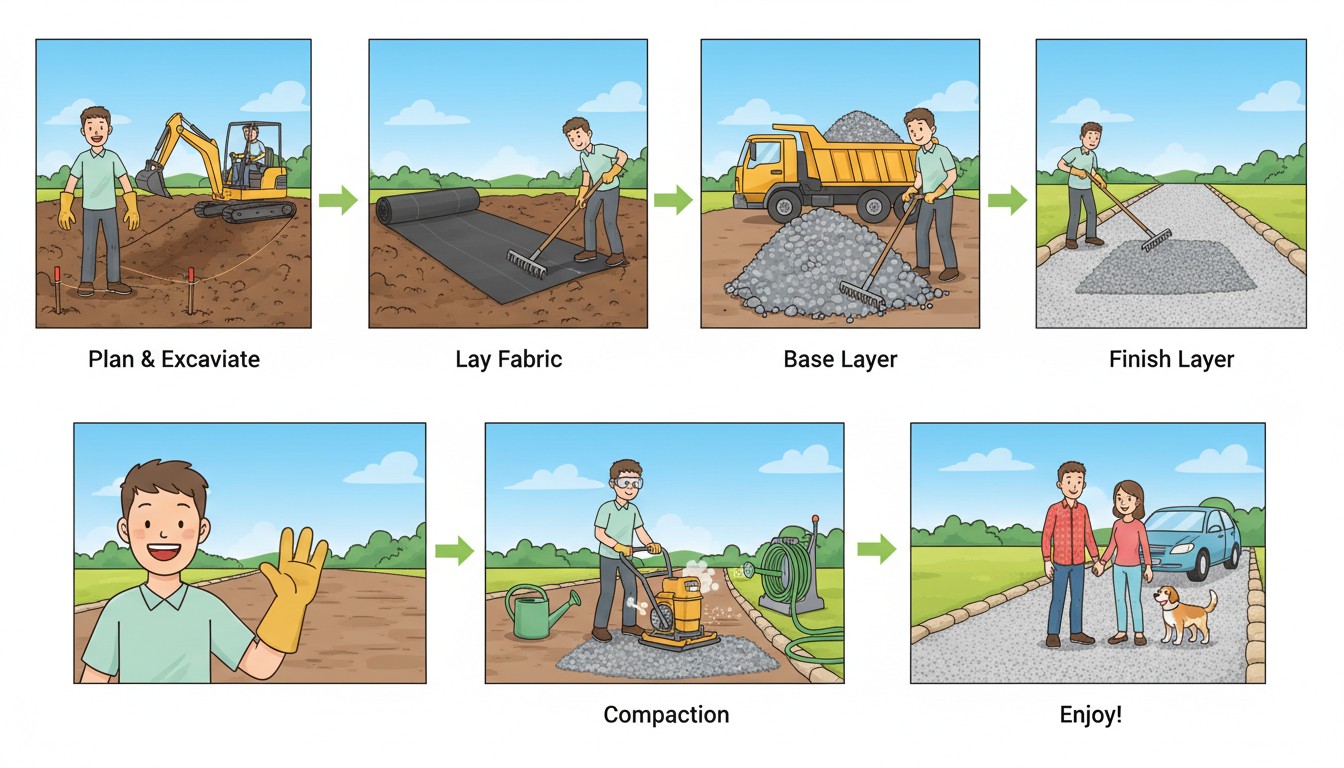
Step 1: Excavation (The Foundation of Everything)
Mark your driveway boundaries with spray paint. Excavate to your calculated depth (6-12 inches) plus 2 extra inches for the topsoil you’ll remove. The key is uniform depth—use a laser level or string line to check. Rent a compact excavator ($200-$300/day) for driveways over 200 sq ft; shovel-only installs result in uneven compaction and premature failure .
Pro tip: Slope the excavation 1 inch per 4 feet from center to edges (crown) for drainage. Water pooling is the #1 cause of driveway failure .
Step 2: Geotextile Fabric (The Invisible Lifeline)
Lay woven or non-woven geotextile fabric across the entire excavated area, overlapping seams by 12 inches. This $200 investment prevents your $1,000 of gravel from sinking into the subsoil and stops weeds from penetrating . Many DIYers skip this step, leading to 50% gravel loss in the first two years. Secure edges with landscape staples every 2 feet.
Step 3: Base Layer Installation (Where Compaction is Everything)
Spread crusher run in 4-inch lifts (layers). If you need 8 inches total base, do two 4-inch layers. Compact each lift with a plate compactor (rent for $50-$75/day). Make 3-4 passes in overlapping patterns. Properly compacted crusher run feels almost as hard as concrete . Skipping compaction leads to ruts within months.
Water the layer lightly before compacting—moisture helps fines bind. Too much water creates mud; too little leaves air pockets.
Step 4: Surface Gravel (The Aesthetic Layer)
Spread your final 2-inch layer of #57 crushed stone. Rake to maintain the crown slope. This layer provides the “crunch” and appearance. Don’t compact this layer heavily—a light pass with the compactor or simply driving on it naturally settles it. Over-compaction pushes surface stone into the base, reducing drainage .
Step 5: Edging Installation (The Maintenance Reducer)
Install edging before final surface gravel. Steel landscape edging ($10-$20/ft) provides invisible restraint. Timber ($5-$15/ft) offers rustic appearance but rots in 5-7 years. Stone ($15-$30/ft) is permanent but requires professional installation. Secure edging with stakes every 3-4 feet. Proper edging reduces gravel migration by 70% and cuts annual maintenance time from 4 hours to 30 minutes .
The Maintenance Protocol: 30 Minutes Monthly for a Lifetime Driveway
A properly installed gravel driveway requires minimal but consistent maintenance. Neglect it for one season and ruts become permanent. Spend 30 minutes monthly and it will outlast your mortgage.
The Snow Removal Challenge
Gravel driveways require modified snow removal: traditional plowing scrapes away stone. Solutions include:
- Skid shoes: Lift plow blade 1 inch above surface
- Snowblower: Single-stage models work best; two-stage can throw gravel
- Post-stone replenishment: Budget $50 annually for stone lost to plowing
Real-World Installations: What Worked, What Failed, and Why
The DIY Masterpiece That Lasted 30 Years
A homeowner in Vermont installed a 400 sq ft gravel driveway in 1994, excavating 12 inches (his soil is heavy clay), laying geotextile fabric, and compacting 10 inches of crusher run in 3-inch lifts. He used steel edging and topped with 2 inches of crushed granite. Thirty years later, he’s added surface stone twice ($300 total) and the driveway is still level, firm, and stable. His initial cost: $1,800. His neighbor’s asphalt drive, installed the same year for $4,500, was replaced in 2015 for $6,800. The gravel driveway’s total 30-year cost: $2,100. Asphalt: $11,300.
The Shortcut Disaster That Required Yearly Reconstruction
A homeowner in Ohio spread 4 inches of pea gravel directly on topsoil to “save money.” Within 3 months, tire ruts were 6 inches deep. He added more pea gravel each spring, spending $400 annually. After 4 years and $1,600 in gravel, the driveway was a bumpy, rutted mess. He finally hired a contractor to excavate and install properly, costing $3,200. His 5-year total: $4,800. Doing it right the first time would have cost $2,200. His mistake? Choosing the wrong gravel type and skipping the base layer to “save” $800.
The Professional Install That Became a Showpiece
A rural property owner hired a professional to install a 1,500 sq ft driveway with 8 inches of base, geotextile fabric, and decorative crushed limestone edges. The contractor used a laser level to create perfect crown drainage and installed steel edging before final grading. The $6,000 installation became the property’s best feature, handling heavy farm equipment and increasing the home’s appraised value by $8,000. Ten years later, the only maintenance has been adding $180 of surface stone once. The key? Proper initial investment in professional grading and base compaction.
Troubleshooting Common Failures: The Diagnostic Guide
Your Driveway Is Your Property’s Gateway
The gravel driveway you’re dismissing isn’t a budget compromise—it’s engineered infrastructure that, when installed correctly, outperforms and outlasts pavement at one-third the cost. It transforms drainage problems into soil enrichment, adapts to freeze-thaw cycles that crack concrete, and provides a maintenance routine that’s therapeutic rather than frustrating.
Your power to create this resilient infrastructure doesn’t depend on heavy equipment certifications or engineering degrees. It depends on one thing: your willingness to understand that the gravel beneath your tires follows physical laws, not aesthetic preferences. The driveway will be installed whether you plan it or not. The ruts will form whether you understand why or not. You can be the property owner with a 30-year driveway that costs pennies annually, or you can be the owner who pays $8,000 every 15 years for asphalt that cracks.
The choice is yours. Start simple. Dig one test hole. Calculate your vehicle weights. Measure your slope. Your infrastructure mastery journey begins with a single decision to see past the pavement marketing—and to build the foundation that will quietly serve you for decades.
Key Takeaways
Gravel driveway materials and layering (crusher run base, crushed stone surface, geotextile fabric) directly control load capacity, drainage, and lifespan more than any other factor.
Cognitive biases like status quo preference and maintenance phobia cause homeowners to overpay 60% for asphalt while gravel offers 30-50 year lifespans at one-third the cost .
Proper installation requires 6-12 inch excavation depth, geotextile fabric, compacted crusher run base in lifts, and steel edging—skipping steps reduces lifespan from decades to years.
DIY installation costs $1-$3/sq ft vs. professional $4-$10/sq ft—saving 50-70% on labor but requiring equipment rental ($300-$500) and precision grading .
Maintenance is minimal ($100-$200 every 3-5 years for top-dressing) but must include monthly raking, quarterly edging checks, and proper snow removal techniques to prevent plow damage .